Layers & Annotation
The globe is a canvas, and two sidebar tabs let you control what's painted on it. Layers decides what imagery and data overlays you see; Annotate lets you draw your own markings on top. Between them you tailor the map to the question in front of you.
The division of labour mirrors a paper map on a planning table: layers are the printed map sheets you choose to lay down; annotations are the grease-pencil marks your team draws over them.
Layers
Open the Layers tab. Overlays are organised into groups:
| Group | What it gives you |
|---|---|
| Base imagery | The map underneath — choose one at a time. Options range from a clean street map to a dark tactical style (recommended when you have a lot of overlays) to high-resolution satellite imagery. |
| Satellite overlays | Stackable imagery such as daily true-colour composites, night-lights (a proxy for activity and infrastructure), and active-fire detection. |
| Weather | Cloud cover, temperature, precipitation, and wind. |
| Live data | Auto-refreshing scientific feeds — earthquakes, natural events, and disaster alerts — that update on their own. |
Most overlays carry an opacity slider so you can blend them with the base map, and live layers have a manual refresh control. Reset All clears every overlay and restores the default dark tactical base — a quick way back to a clean slate.
Custom layers
You can bring your own geospatial data onto the globe. Under Custom Layers, click + Add Layer and choose a format:
- GeoJSON — by URL or pasted directly
- WMS / XYZ — standard web map and tile services
- ArcGIS — map-server and feature-server layers
- KMZ/KML — fetched from a URL and converted automatically, with a sync indicator showing when it last updated
Give it a name and colour, save, and toggle it like any built-in layer. Custom layers are remembered between sessions.
Tip: Start from the dark tactical base when you're going to stack overlays — light base maps quickly become unreadable under markers and hulls, the same way pencil notes vanish on a busy printed page.
Annotation
Open the Annotate tab to mark up the globe directly.
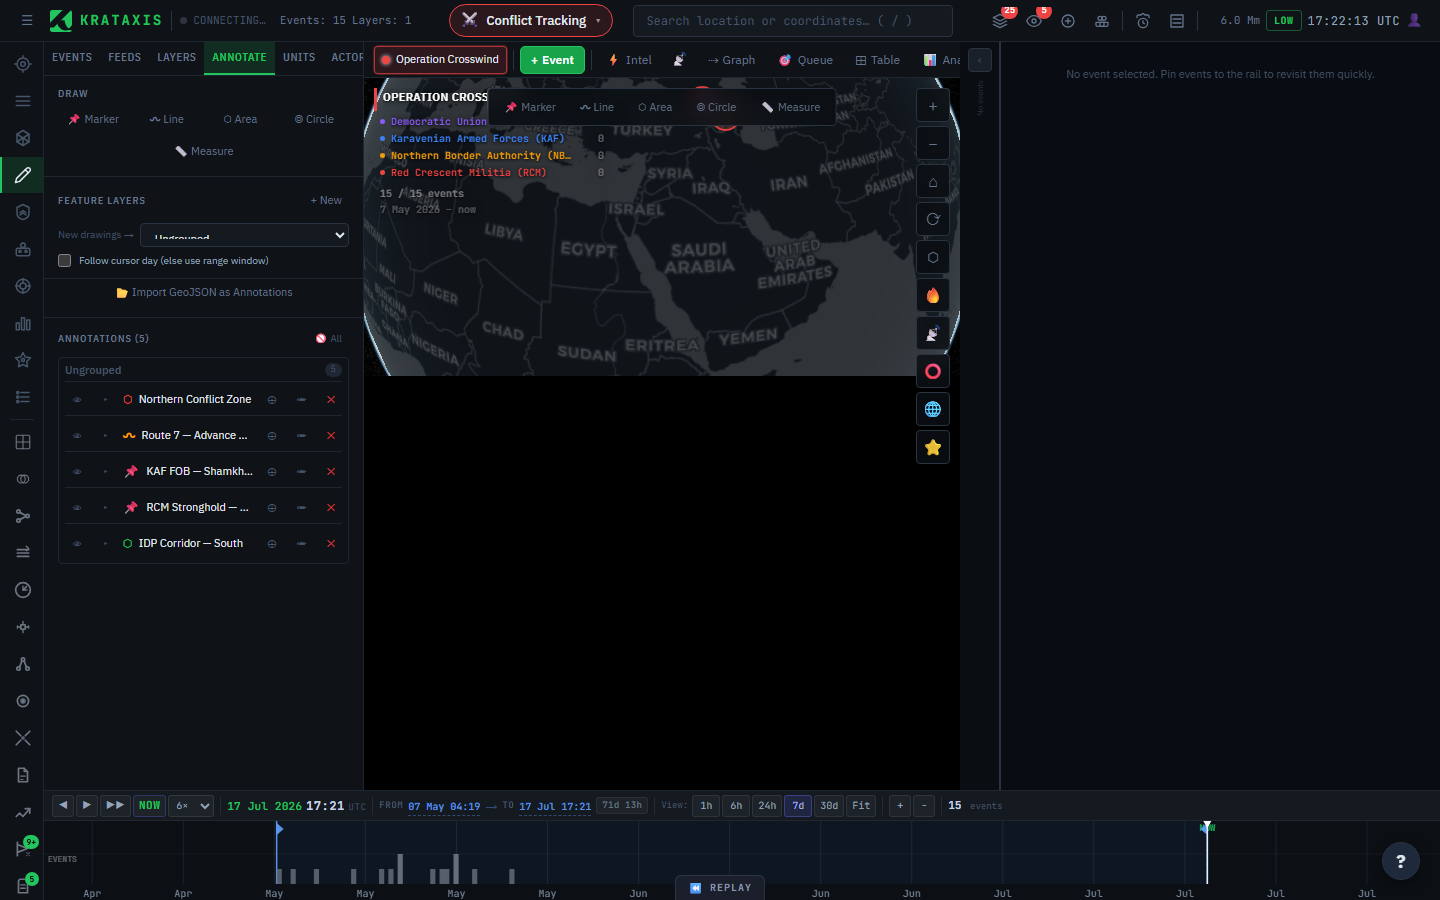
The tools:
| Tool | Use |
|---|---|
| Marker | Drop a single labelled point |
| Polyline | Draw a multi-segment line |
| Polygon | Draw a filled area |
| Circle | Draw a radius circle |
| Measure | Measure distance between two points |
Drawing: pick a tool, click on the globe to place points, then double-click or press Enter to finish (Escape cancels). A panel then lets you name the annotation and pick a colour before saving.
Editing: click any annotation to rename it, change its colour, or delete it.
Scoping annotations to a battlespace
Annotations can be tied to a specific battlespace. A scoped annotation only appears when that battlespace's focus mode is active — so your markup for one situation never clutters another. Leave an annotation unscoped to keep it visible everywhere.
This is worth using deliberately. Marked-up front lines, staging areas, and corridors are analysis — they belong to the situation they describe, and scoping keeps each battlespace's story on its own page.
Where to next
- Battlespaces — scoping your map markings to one situation.
- Areas of Interest & Alerting — when you want a drawn area to alert you, not just mark the map.